RubyOnRails 10) Tinymce Text편집기
참고 :
http://blog.naver.com/PostView.nhn?blogId=kbs4674&logNo=221039105137
http://hibee.tistory.com/13
기본적인 Textarea가 아닌 글꼴이나 크기 등을 지정할 수 있는 텍스트 편집기 gem에 대해 공부하고자 한다.
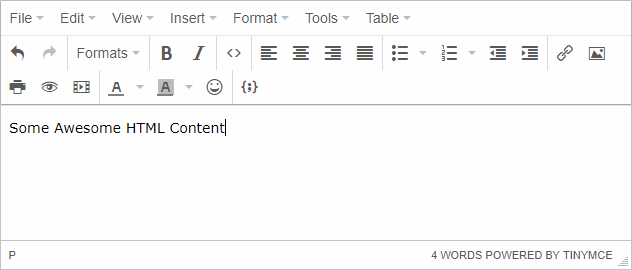
Tinymce를 활용할 경우 다음과 같은 텍스트 편집기를 사용할 수 있다.
(시작하기에 앞서 기본적인 세팅은 다음의 페이지를 참고하여 세팅하기를 추천한다.)
먼저, 다음의 gem들을 설치해준다.
tinymce의 경우 우리가 사용하려는 gem이고, carrierwave는 이미지 업로드를 위한 gem,
fog의 경우 이미지 원격 저장소를 위한 gem이다.
1 2 3 4 5 6 7 | /Gemfile gem 'tinymce-rails-imageupload', '~> 4.0.0.beta' gem 'carrierwave' gem 'fog', '~> 1.41.0' $ bundle | cs |
그리고 다음의 명령어를 통해 새로운 DB 파일을 추가해준다.
1 | $ rails g model image alt:string hint:string file:string | cs |
그리고, 기존의 Post 파일들을 삭제 후 새롭게 만들어 준다.
1 2 | $ rails db:drop $ rails db:migrate | cs |
그리고, 다음의 파일을 생성 후 코드를 넣어줘서 텍스트 편집기를 설정해준다.
1 2 3 4 5 6 7 8 9 | \config\tinymce.yml toolbar: undo redo | forecolor | bold italic | alignleft aligncenter alignright | fontselect | code | link | uploadimage | table | plugins: - link - uploadimage - textcolor - code - table | cs |
다음, 텍스트 편집기에서 사용할 이미지를 업로드하기 위해서 다음의 모델을 만들어준다.
1 | $ rails g uploader image | cs |
(그 외 uploader 상세 설정은 기존 carrierwave 편 참고)
그리고, image.rb 파일에 다음의 내용 추가.
1 2 3 4 5 | \app\models\image.rb class Image < ApplicationRecord mount_uploader :file, ImageUploader end | cs |
그리고 다음의 Controller들을 생성하여 다음의 코드를 입력.
1 2 3 4 5 6 7 8 9 10 11 12 13 14 15 16 17 18 | \app\controllers\images_controller.rb 생성 class ImagesController < ApplicationController def new @image = Image.build.params(image_params) end def show @image = Image.find(params[:id]) end private def image_params params.require(:image).permit(:file, :hint, :alt, :post_id, :all_notice_id) end end | cs |
1 2 3 4 5 6 7 8 9 10 11 12 13 14 15 16 | \app\controllers\tinymce_assets_controller.rb 생성 class TinymceAssetsController < ApplicationController def create # Take upload from params[:file] and store it somehow... # Optionally also accept params[:hint] and consume if needed image = Image.create(:file => params[:file]) params.permit(:file, :alt, :hint) render json: { image: { url: image.file.url } }, content_type: "text/html" end end | cs |
다음, Route에 경로 추가
1 2 3 4 | \config\routes.rb ... post '/tinymce_assets' => 'tinymce_assets#create' | cs |
그리고 보여줄 부분(view 파일)에 다음의 코드로 수정.
1 2 3 4 5 6 7 8 9 10 11 12 13 | \app\views\posts\show.html.erb ... <%= content_tag(:div, @post.content.html_safe, :class => "panel-body") %> \app\views\posts\new.html.erb ... <textarea name="content" class="tinymce" style="width:80%" rows="15"></textarea> <%= tinymce %> \app\views\posts\edit.html.erb ... <textarea name="content" class="tinymce" style="width:80%" rows="15"><%=@post.content%></textarea> <%= tinymce %> | cs |
마지막으로, css와 js를 살짝 수정한다.
1 2 3 4 5 6 7 | /app/assets/stylesheets/application.css ... .panel-body img{ max-width : 100%; max-height : 100%; } | cs |
1 2 3 4 | \app\assets\javascripts\application.js ... //= require tinymce | cs |
'Archived(Programming) > Ruby on Rails(기초)' 카테고리의 다른 글
| RubyOnRails 9) Category 나누기 (0) | 2018.12.31 |
|---|---|
| RubyOnRails 8) Impressionist 조회수 구현 (0) | 2018.12.30 |
| RubyOnRails 언어 설정 (0) | 2018.12.30 |
| RubyOnRails 7) Pagination 페이지 나누기 (0) | 2018.12.29 |
| RubyOnRails 6) Carrierwave 이미지 첨부 기능 (0) | 2018.12.28 |
