개요
API 라는 단어는 익숙하고 만들어진 API를 수정해본 적은 있으나 생각해보니 처음부터 만들어본 적이 없었다.
테스트 환경도 전부 세팅 되어있던 것들을 통해 진행하다보니, 간단한 것이라도 처음부터 만들어보고자 해서 포스팅을 해보게 되었다.
가장 기본적인 게시글 작성(post create)을 API 형태로 만들고 이를 postman을 통해 테스트를 해보고자 한다.
API 작성
Rails 프로젝트를 하나 만든다.
rails new 프로젝트명
bundle install
기본적인 Model과 Controller 생성해준다. 그리고 당연히 migrate도 해준다.
rails g model Post title:string content:string user_id:integer
rails g model User name:string
rails g controller Posts
rake db:migrate
간단한 관계 설정도 명시해준다.
|
1
2
3
4
5
6
7
8
9
10
|
# app/models/user.rb
class User < ApplicationRecord
has_many :posts
end
# app/models/post.rb
class Post < ApplicationRecord
belongs_to :user
end
|
cs |
route도 설정해준다. post에 대한 create 기능만 사용해보고자 한다.
|
1
2
3
4
5
6
|
# config/routes.rb
Rails.application.routes.draw do
# For details on the DSL available within this file, see https://guides.rubyonrails.org/routing.html
resources :posts, only: [:create]
end
|
cs |
Controller 내용을 추가해준다.
|
1
2
3
4
5
6
7
8
9
10
11
12
13
14
15
16
17
18
|
# app/controllers/application_controller.rb
class ApplicationController < ActionController::Base
# authentication 미필요
protect_from_forgery with: :null_session
# set default user
def default_user
user = User.first
# nil과 blank 용도차이(false, 공백값 유효성 등)
if user.blank?
user = User.create(name: "test")
end
user
end
end
|
cs |
위의 null_session 옵션을 사용하면 간단한 테스트에서의 불필요한 인증 없이 편하게 사용가능해서 임의로 추가했다. 참고로 blank와 nil의 용도차이는 false나 공백값 등 여러 값들에 대한 반환값이 다르기에 위 상황엔 blank가 더 적절할 듯하다.
그리고 post를 생성하는 controller의 기본적인 create 메서드를 추가한다.
|
1
2
3
4
5
6
7
8
9
10
11
12
13
14
15
|
# app/controllers/posts_controller.rb
class PostsController < ApplicationController
def create
post = Post.new(post_params)
post.user = default_user
post.save! # save vs save!(rails Exception)
render json: post.to_json
end
private
def post_params
params.require(:post).permit(:title, :content)
end
end
|
cs |
위에서 참고적으로 save와 save!의 차이점은 save는 save의 성공과 실패에 따라 boolean 값을 반환하지만 save!는 exception을 발생시킨다. 간단한 것들인데도 if를 걸어서 raise로 exception을 구현하려다가 알게 되었다. 처리는 rescue를 통해서 한다.
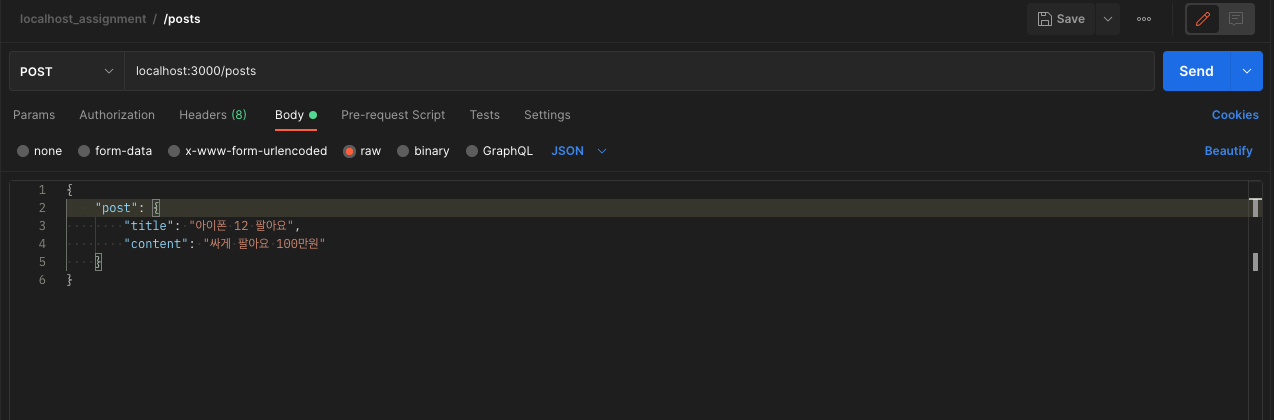
테스트를 위해 Postman을 통해서 post request를 보낸다.
여기서 json형태의 text를 설정해주고 꼭 { } 를 통해 잘 감싸줘야한다.
send를 통해 날리면 아래와 같은 json body 값을 받을 수 있다.
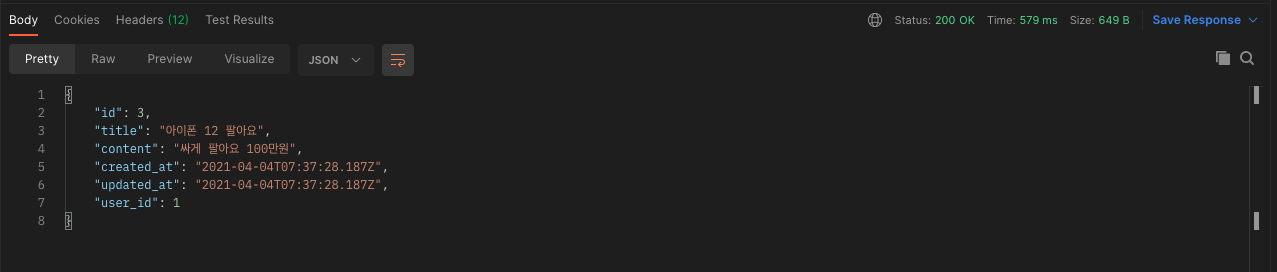
콘솔 통해서 데이터 확인.

참고
- dev.to/caicindy87/rendering-json-in-a-rails-api-25fd
- edgeguides.rubyonrails.org/active_record_migrations.html
- kbs4674.tistory.com/180
- guides.rubyonrails.org/routing.html
참고로 중간에 컬럼 추가 및 삭제를 하다가 명령어 오타를 냈다가 찾아보게 됐는데 컬럼 추가 및 삭제는 아래와 같은 규칙을 가지고 있다. :index 옵션을 주면 index 추가도 가능
rails generate migration add_fieldname_to_tablename fieldname:string
rails g migration add_field_to_table field:type:index
rails generate migration remove_fieldname_to_tablename fieldname:string
'Web Programming > Ruby on Rails' 카테고리의 다른 글
| Rails 분석 Gem 비교(조회수, 방문통계 등) (0) | 2021.06.22 |
|---|---|
| Rails Cache 캐시 (0) | 2021.05.09 |
| Rails Test (feat. TDD를 위한 기반) (2) | 2021.03.28 |
| Rails 손쉬운 검색 form ransack (0) | 2021.03.20 |
| Rails Database 관리 Gem(rails_db) (0) | 2021.03.20 |


